Table of Contents
- Why Spotting Poor Siding Installation Matters
- Common Siding Installation Mistakes to Watch For
- Vinyl Siding Installation Problems and What They Mean
- Flashing and Weather Barrier Issues
- How to Inspect New Siding: A Step-by-Step Checklist
- Improperly Installed Siding Repair: What to Do Next
- Distinguishing Installation Defects from Normal Movement
- Frequently Asked Questions
Last Updated: October 12, 2026
Why Spotting Poor Siding Installation Matters
Poor siding installation is one of the most common problems we see across the region.
Water seeping behind improperly installed siding can damage framing, insulation, and interior walls within months, while gaps let air escape and cut energy efficiency.
Spotting poor siding installation early matters.
This guide covers the signs of improper siding installation, how to inspect your home safely, and what to do if you find problems.
Common Siding Installation Mistakes to Watch For
Poor siding installation typically falls into a few clear categories. Knowing them helps you spot problems on your own home or during a contractor walkthrough.
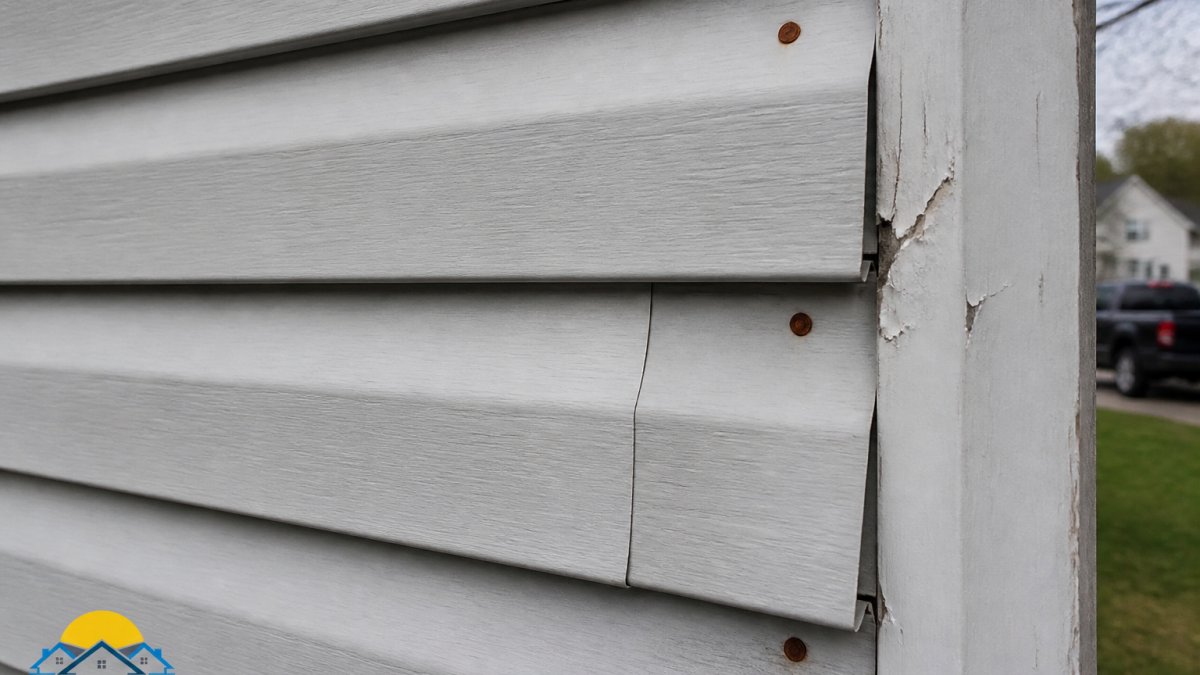
Uneven, Crooked, or Wavy Panels
Crooked siding is one of the easiest signs of poor installation to spot. Panels should run in straight horizontal lines; when they dip, sag, or wave, the installer likely didn’t prepare the wall or nail panels at the correct spacing.
Wavy siding happens when wall sheathing wasn’t flat, panels were nailed too tight, the installer didn’t check for level, or framing underneath is uneven or damaged.
Gaps Between Siding Pieces
Gaps between siding panels are a major red flag. They let water behind the siding where it damages insulation and framing, and allow air leakage that raises heating and cooling costs. Look for horizontal gaps where panels meet, vertical gaps at corners, gaps where siding meets trim, windows, or doors, and gaps wider than a credit card.
Improper Nailing and Fastener Placement
Nails hold siding in place, so when they’re placed wrong, panels pull loose, buckle, or separate. Poor nailing is one of the most common poor siding installation mistakes we encounter. Correct nailing requires nails in the center of the nailing slot, spaced 16 inches on center for most siding, driven straight and left slightly loose.
Vinyl Siding Installation Problems and What They Mean
Vinyl siding is durable and low-maintenance when installed correctly, but it has specific installation requirements many contractors overlook.
Warping and Buckling
Warped or buckled vinyl siding usually means panels were installed too tight. Vinyl expands and contracts with temperature, sometimes by as much as 1/2 inch per 12 feet of panel length, and tight nails leave no room for that movement. Buckling appears as a horizontal wave or bulge, most visible in direct sunlight, and buckled panels can crack, separate, or trap water underneath.
Missing or Damaged Shingles
Some homes use vinyl shingle-style siding. Missing shingles or damaged edges indicate installation problems or carelessness; each shingle should overlap the one below by at least 1 1/4 inches. Check for shingles that aren’t overlapping properly, torn or cracked edges, loose or separating shingles, and gaps where shingles should meet.
Thermal Movement and Expansion Gaps
Vinyl expands when warm and contracts when cold. Professional installation accounts for this movement; poor siding installation ignores it. Expansion gaps should be 1/4 inch at corners and trim, left unfilled so panels can move, and consistent across all joints. When installers caulk expansion gaps or install panels too tight, the siding has nowhere to move, causing buckling, cracking, and separation.
Flashing and Weather Barrier Issues
Flashing and the weather-resistive barrier (WRB) are the two systems that actually keep water out of your walls. Siding is a rainscreen, it sheds bulk water but is not waterproof.
The correct sequence is sheathing, then WRB, then flashing, then siding. Each layer must lap over the one below so water always has a path back to the exterior; any layer out of order or lapped the wrong way creates a place for water to sit.
How Water Actually Gets Behind Siding
Water reaches the wall cavity through four paths: wind-driven rain pushed through gaps at panel joints, corners, and trim; capillary action pulling water sideways through overlapping layers that touch; gravity carrying water down until it hits a penetration (window, door, hose bib, light fixture) and finds an unsealed edge; and vapor diffusion moving interior moisture outward through the wall assembly.
Flashing Defects You Can See From the Ground
Flashing is required at every place the wall is interrupted. The International Residential Code (IRC) Section R703.4 identifies the locations where flashing must be installed, including wall intersections with roofs and decks; above windows, doors, and other openings (head flashing); below windows and doors (sill pan flashing); at the base of the wall where siding meets a foundation or slab; and at all penetrations, vents, hose bibs, electrical boxes, dryer vents.
Weather Barrier Defects
The WRB, often a housewrap like Tyvek or Typar, or a fluid-applied membrane, must be continuous across the wall. Common failures include horizontal seams lapped the wrong way (WRB must lap shingle-style, with the upper course overlapping the lower course by at least 6 inches, so water runs over the seam instead of into it); vertical seams not taped (manufacturer instructions for most housewraps require seams to be taped with the manufacturer’s approved tape, untaped seams are open doors for water); WRB not integrated with flashing (the WRB must lap over the flashing at the top of a penetration and under the flashing at the bottom, if the two systems are not shingled together, water finds the gap); tears, holes, or gaps around penetrations (every hole cut for a pipe, wire, or vent must be sealed with the manufacturer’s approved tape or a flexible flashing membrane); and WRB installed over the flashing instead of under it (this reverses the drainage plane and traps water behind the barrier).
The Diagnostic Question That Separates the Two
When you find water staining or rot, ask: is the water coming from above the damage or from the side? Water from above usually points to a flashing defect, a missing kick-out, a reversed head flashing, or a sill pan that was never installed. Water from the side or across a broad area usually points to a WRB defect, an untaped seam, a torn section, or a barrier that was never integrated with the flashing.
Do not probe behind siding with a screwdriver or awl to check for moisture. You can puncture the WRB and create the exact leak you are trying to find. If you suspect water intrusion, look for interior signs, staining on drywall, a musty smell, or peeling paint, and call a qualified inspector.
International Code Council, IRC Section R703 exterior covering and flashing requirements
How to Inspect New Siding: A Step-by-Step Checklist
Most siding inspection advice stops at “walk around and look for problems.” That is not enough: acceptable details vary by material, some checks require a ladder or a professional, and a few can damage your siding if done wrong. This checklist covers what you can safely do from the ground, what needs a closer look, and what to hand off to a qualified inspector.
What You Can Safely Check From the Ground
Stay on the ground for these. Use binoculars for anything above the first story.
- Straight lines. Stand at one corner of the house and sight down the length of each wall. Panels should run in a straight horizontal line. A dip, sag, or wave is a red flag.
- Panel alignment at corners. Inside and outside corners should be tight and consistent. Look for corner posts that are cocked, gaps that widen toward the top, or caulk smeared over a joint that should be open.
- Visible gaps. Look at every joint between panels, at trim, and around windows and doors. A credit card is roughly 0.03 inches thick, use it as a rough gauge for “small.” Anything you can see clearly from the ground is worth a closer look.
Material-Specific Tolerances
Acceptable details differ by product.
Vinyl siding. Vinyl expands and contracts significantly with temperature.
Fiber cement siding. Fiber cement moves less than vinyl but is heavier and more brittle.
Wood siding. Wood moves the most of any common siding material.
Engineered wood and composite siding. These products vary widely.
Quantified Performance Checks
These checks give a rough sense of whether the wall is performing. Use them as signals, not verdicts.
- Moisture check. A handheld pin-type moisture meter, available at most hardware stores, can be pressed against interior drywall near exterior walls. Elevated readings compared to interior walls in the same room suggest water is getting in. Do not push pins into siding itself, you will leave holes.
- Draft check. On a cold, windy day, hold the back of your hand near outlets, switch plates, and trim on exterior walls. A noticeable draft suggests air is moving through the wall assembly, which often traces back to gaps in the WRB or unsealed penetrations.
- Panel movement check. Gently press on a panel from the ground where you can reach it. It should flex slightly and return. A panel that feels loose, rattles, or moves more than about 1/4 inch is likely under-fastened.
None of these checks definitively prove the installation is bad. They tell you where to look next.
When to Stop and Call a Professional
Do not climb a ladder onto a roof or second-story wall to inspect siding. Falls are the leading cause of serious injury in home maintenance, and siding inspection is not worth the risk. Call a licensed home inspector or qualified siding contractor if the suspected defect is above the first story; you see interior water staining, mold, or a musty smell; you suspect the WRB or flashing is compromised (confirming it requires removing siding); you are within a warranty period and need documentation for a claim; or you are buying a home and want an independent assessment before closing.
Inspect on a cool morning or evening. Vinyl siding expands in heat and can mask gaps and misalignment that are obvious when the material is at rest. Fiber cement and wood do not move as much, but cooler temperatures still give you a more accurate read on joint gaps.
Improperly Installed Siding Repair: What to Do Next
Finding problems doesn’t mean panic. Many siding defects can be corrected if caught early.
Documenting the Problem
Take detailed photos from multiple angles, close-ups of specific defects and wider shots of the overall area. Timestamps help establish when you discovered the problem. Write down the location of each defect (which wall, approximate height), the type of defect (gap, wavy panel, rusty nail, etc.), its size or severity, the date you discovered it, and any water damage or staining you notice.
Understanding Your Warranty and Contractor Remediation
Most siding installations come with workmanship warranties covering installation defects for one to five years.
Contact your contractor in writing (email is best) describing the defects. Attach photos. Give them a reasonable timeframe to respond. Many contractors will correct obvious installation mistakes if notified promptly.
Do not attempt to repair siding defects yourself unless you have experience. Improper repair can make problems worse and void your warranty. Always contact your contractor or a licensed professional first.
When to Call a Professional Inspector
Call a licensed home inspector or siding specialist if you see water stains or mold inside, multiple large defects exist across your siding, the contractor refuses to address problems, you’re considering legal action or insurance claims, or you’re buying a home and want an independent assessment.
Professional inspectors document problems in writing and provide detailed reports, creating an official record for warranty claims or contractor disputes.
Distinguishing Installation Defects from Normal Movement
Not every imperfection means poor siding installation. Some conditions are normal and don’t require repair.
The key difference is consistency. Normal movement affects all panels similarly.
Most poor siding installation problems appear within the first year. Regular inspection during seasons with temperature extremes (winter and summer) helps catch defects early when they’re easier and cheaper to fix.
Poor siding installation creates problems that compound over time.
At All Weather Exteriors LLC, we’ve spent over 25 years installing siding the right way.
Frequently Asked Questions
How can you tell if siding was installed incorrectly?
Poor siding installation shows clear signs: uneven or crooked panels, visible gaps between pieces, fasteners driven too tight or too loose, and water damage around windows or doors. Look for warping, buckling, or wavy surfaces that indicate the panels weren’t properly secured or allowed room for thermal movement. Check that flashing is properly sealed and weather barriers are intact. If water is entering your home or you see moisture damage on interior walls, the installation likely failed to protect against water intrusion.
What are the most common siding installation mistakes?
The most frequent mistakes include incorrect nailing technique (driving fasteners too tight, restricting panel movement), inadequate expansion gaps that prevent thermal movement, improper flashing installation around windows and doors, gaps left between siding pieces, and failure to properly prepare the wall sheathing and framing. Contractors sometimes skip proper weather barrier installation or don’t follow manufacturer guidelines for panel alignment. Uneven panels and surface misalignment are also common, indicating poor workmanship during the initial installation process.
Can improperly installed siding cause water damage?
Yes, poor siding installation is a leading cause of water damage. Gaps between panels, improper flashing, and missing or damaged weather barriers allow moisture to penetrate behind the siding and into your home’s structure. Water can damage insulation, compromise framing, and lead to mold growth. Even small installation defects can allow water intrusion during heavy rain or when snow melts. This is why identifying installation problems early is critical, water damage becomes exponentially more expensive to repair the longer it goes undetected.
Should vinyl siding move when you push on it?
Vinyl siding panels should have slight flexibility and minimal movement when pushed, but excessive movement indicates improper installation. Panels should be securely fastened but not so tight that they can’t expand and contract with temperature changes. If panels move significantly or feel loose, fasteners may be missing, improperly spaced, or driven incorrectly. A small amount of give is normal and necessary for thermal expansion, but panels shouldn’t shift noticeably or make noise when touched. If movement is excessive, contact a professional to assess the installation quality.