Table of Contents
- Why Ice Dams Keep Coming Back (and What Actually Stops Them)
- Step 1: Diagnose the Problem Before You Fix Anything
- Step 2: Attic Insulation for Ice Dam Prevention
- Step 3: Air Sealing Attic Bypasses and Gaps
- Step 4: Meeting Roof Ventilation Requirements
- Step 5: Managing Snow, Gutters, and Roof Temperature
- Ice Dam Removal Tools and Emergency Response
- What It Costs and What You Get Back
- Frequently Asked Questions
Last Updated: October 6, 2026
Why Ice Dams Keep Coming Back (and What Actually Stops Them)
Most homeowners fight ice dams the same way every winter.
That cycle repeats because ice dams are not really a roof problem. They are a heat problem.
At All Weather Exteriors LLC, we have spent more than 25 years fixing the damage these cycles cause across New Hampshire and Massachusetts.
This guide walks you through the same five-step diagnostic and repair process we use on homes every winter.
Step 1: Diagnose the Problem Before You Fix Anything
Ice dam prevention starts with finding where heat escapes, not with buying tools. A proper diagnosis takes an hour and saves you from wasting money on fixes that treat symptoms.
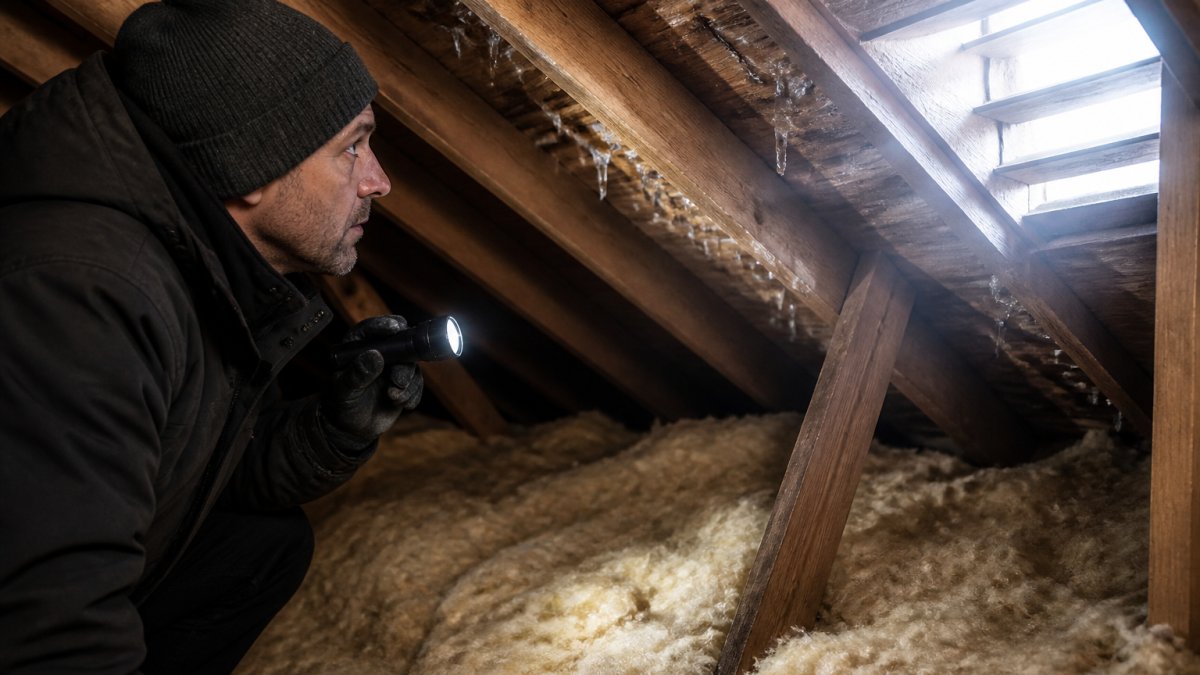
Start in the attic on a cold day. Bring a flashlight and look for these clues.
Signs of Hidden Heat Loss in Your Attic
- Frost or water stains on roof decking and nail tips
- Warm spots on the roof that melt snow in patches
- Damp, matted insulation near chimneys and hatch doors
When to Call a Professional for an Assessment
Some signs mean you should stop and call a licensed contractor. If you see sagging decking, mold, or widespread moisture, the problem is bigger than a weekend project. The same goes for any home with a steep roof or a finished attic that blocks access.
A professional assessment checks airflow, insulation depth, and moisture in one visit. For homes in our region, that inspection often reveals several problems at once, not just one.
Step 2: Attic Insulation for Ice Dam Prevention
Attic insulation for ice dam prevention works by keeping heat inside your living space instead of letting it warm the roof. More insulation means a colder roof deck, and a colder roof deck means less melting and refreezing.
The goal is a steady attic temperature that stays close to the outdoor air. When that happens, snow on the roof melts slowly from the sun, not from your furnace.
Recommended Insulation Levels for Cold Climates
Cold-climate homes generally need deeper insulation than builders installed decades ago. Older homes often have far less than current guidelines suggest.
- Check the depth against your joists. If you can see them, you likely need more.
- Add insulation in layers to reach the recommended depth for your climate zone.
- Never compress insulation. Squashing it lowers its R-value.
The U.S. Department of Energy publishes recommended home insulation levels by climate zone that give you a clear target. Match your home to the right zone before you buy anything.
Before adding insulation, seal the air leaks first. Piling insulation over an open gap traps warm air and moisture, which can cause mold instead of stopping the ice.
Step 3: Air Sealing Attic Bypasses and Gaps
Air sealing attic bypasses and gaps is the single most effective step for preventing ice dams on roof surfaces. Bypasses are hidden openings that let warm air pour into the attic all winter.
Common bypasses include:
- Gaps around chimney and flue penetrations
- Open tops of interior walls
- Recessed light fixtures and ceiling fans
Seal these with caulk, spray foam, or rigid covers rated for the job. A common mistake is sealing only the obvious gaps and missing the ones hidden under insulation.
Step 4: Meeting Roof Ventilation Requirements
Roof ventilation requirements matter because air sealing alone is not enough. A sealed attic still needs a way to flush out the small amount of moisture and heat that gets in.
Ventilation keeps the roof deck cold and dry. Without it, trapped moisture rots decking and feeds mold.
Intake and Exhaust: Why Both Matter
Ventilation only works when air has a way in and a way out. Intake vents at the eaves pull in cold outdoor air. Exhaust vents at the ridge or gable let warm, moist air escape.
- Blocked intake vents starve the system, so keep soffits clear
- Exhaust vents should sit high, near the roof peak
- Balanced intake and exhaust move air evenly across the whole deck
Get this balance wrong and you create a pressure problem that pulls warm air up anyway. That is why we check both ends of the system, not just one.
Step 5: Managing Snow, Gutters, and Roof Temperature
Managing snow, gutters, and roof temperature handles the short-term risk while your insulation and air sealing do the long-term work.
Clean gutters and downspouts let meltwater drain away instead of pooling and refreezing at the roof edge.
- Clear gutters before the first hard freeze
- Use a roof rake to pull snow off the lower roof edge after storms
- Never chip at ice with an ax, chisel, or hammer
A cold, well-vented roof with clear gutters rarely forms a serious dam. The snow still melts, but it drains instead of backing up.
Ice Dam Removal Tools and Emergency Response
Ice dam removal tools help in a pinch, but they treat the symptom, not the cause. Use them to buy time until you can fix the real problem. The key is knowing which tools are safe, which cause damage, and when to stop and call a professional.
Safe Tools and How to Use Them
- Roof rake with an extended handle. Pull snow off the lower roof edge from the ground. Never pull snow from the top down, which can cause an avalanche. Work in small pulls and keep the rake head on the snow, not the shingles.
- Calcium chloride ice melt in a sock or pantyhose. Place it on the ice to melt channels. Calcium chloride works down to about -25°F, while rock salt stops working around 20°F. Never use rock salt on shingles; it damages the surface and kills grass below.
- Heated de-icing cables. Install them along the eaves and in gutters before winter. They melt a path for water to drain. Look for cables rated for your roof type and plug them into a GFCI outlet. Never use extension cords that are not rated for outdoor use, and never nail or staple cables to the roof.
What Makes It Worse
- Hitting ice with a hammer, ax, or chisel. You will crack shingles and create leaks that cost far more to fix than the ice dam itself.
- Pouring rock salt on shingles. It damages the shingle surface and corrodes metal flashing.
- Using a pressure washer. It forces water under the shingles and can strip granules.
Never chip or hammer ice off your roof. You will crack shingles and create leaks that cost far more to fix than the ice dam itself. If you cannot reach the ice safely from the ground, stop and call a professional.
When Snow Removal Should Be Left to Professionals
Call a professional when the snow load is heavy, the roof is steep, or ice has already pushed water inside. These jobs carry real fall and structural risk.
- Snow deeper than a few feet on the roof
- Any roof pitch you would not walk on in summer
- Visible sagging, cracking, or water stains indoors
Professional removal uses steamers and specialized tools that melt ice without damaging shingles. Many contractors also offer emergency response after storms.
Electrical Safety for De-Icing Cables
De-icing cables draw significant power and can overheat if installed incorrectly. Follow these rules:
- Use only cables listed by a nationally recognized testing laboratory (like UL).
- Plug into a GFCI-protected outlet. Never use a cheater plug or adapter.
- Do not overlap cables; overlapping can cause overheating and fire.
If you are unsure about installation, hire a licensed electrician. The cost of a professional install is small compared to the risk of a fire.
Emergency Response Checklist
When an ice dam is actively leaking:
- Move valuables and electronics away from the leak area.
- Place buckets and towels to catch water.
- If safe, use a roof rake to remove snow from the lower edge.
- Do not climb onto the roof. Call a professional if water is entering the home.
- Document damage with photos for your insurance claim.
Most homeowners insurance policies cover sudden water damage from ice dams, but not the cost of prevention or maintenance. Check your policy before winter to understand your coverage.
What It Costs and What You Get Back
Prevention costs less than repair, every time. Water damage from a bad ice dam can wreck ceilings, insulation, and drywall, and those repairs add up fast.
Prevention Costs
- Air sealing attic bypasses: $500 to $1,500 for a typical attic, depending on the number of penetrations and accessibility. This is the highest-return fix.
- Adding attic insulation: $1,500 to $3,500 for blown-in fiberglass or cellulose to reach recommended R-values. Cost depends on attic size and existing insulation depth.
- Improving ventilation: $500 to $1,200 for additional soffit or ridge vents, including labor. If you need a new ridge vent, expect $800 to $1,500.
Repair Costs If You Do Nothing
- Interior water damage: $1,000 to $5,000 for drywall, paint, and insulation replacement in a single room.
- Mold remediation: $1,500 to $6,000 depending on the extent and area affected.
- Roof deck repair: $500 to $2,000 for replacing rotted sheathing and shingles.
A single ice dam event can easily cost more than all the prevention measures combined. That is why we recommend starting with air sealing and insulation before buying cables or rakes.
Return on Investment
Most homeowners recoup the cost of air sealing and insulation through lower heating bills. The U.S. Department of Energy estimates that air sealing and insulating your attic can save you on heating costs annually.
Beyond energy savings, you get:
- Fewer winter emergencies and less stress
- A roof that lasts longer without water damage
- Better indoor comfort and less draft
How to Prioritize Your Spending
If you can only do one thing this year, seal air leaks first. It is the cheapest fix with the biggest impact. Next, add insulation to reach recommended levels. Then improve ventilation if needed. De-icing cables and roof rakes are last-resort tools, not long-term solutions.
A professional energy audit, often available through utility programs, can pinpoint exactly where your home loses heat and help you target your budget.
Ask your contractor for a written scope of work that separates air sealing, insulation, and ventilation. That way you can phase the project over two seasons if needed without losing the diagnostic value of the first visit.
Frequently Asked Questions
What can I put on my roof to stop ice dams?
The most effective roof-level solution is installing a self-adhering ice and water shield membrane along the eaves before shingles go down. This waterproof barrier prevents water backup from entering the roof deck. De-icing cables can help as a temporary measure, but they address the symptom rather than the root cause. The permanent fix is reducing heat loss through attic insulation, air sealing, and proper ventilation so the roof stays cold and snow does not melt and refreeze at the roof edge.
Does homeowners insurance cover ice damming?
Most homeowners insurance policies cover sudden water damage from ice dams, such as stained ceilings or damaged drywall, but they typically exclude the ice dam removal itself and long-term damage from neglect. Coverage varies by policy and state, so review your specific documents. Some insurers require proof that you maintained the roof and attic properly. If water backup coverage is not included, ask your agent about adding it before winter.
How do roofers get rid of ice dams?
Roofers remove ice dams using steam equipment, which melts channels through the ice without damaging shingles. They may also use specialized tools to chip away ice carefully, though this carries risk of shingle damage. After removal, they assess the underlying cause, such as inadequate attic insulation or blocked ventilation, and recommend permanent fixes. Never attempt to chip ice with an axe or hammer, as this can puncture roofing and create leaks worse than the dam itself.
Can attic insulation help prevent ice dams?
Yes. Attic insulation for ice dam prevention works by keeping heat inside your living space instead of escaping into the attic and warming the roof deck. When the roof surface stays cold, snow does not melt and refreeze at the eaves. The U.S. Department of Energy recommends R-49 to R-60 for attics in cold climates. Pairing insulation with air sealing and proper ventilation delivers the best results and can also lower your heating bills.