
Table of Contents
- Why Window Flashing Installation Matters
- Visible Signs of a Bad Window Installation
- Missing Window and Door Flashing: What It Looks Like
- How to Inspect Window Flashing Without Removing Siding
- Distinguishing Flashing Failure from Other Causes
- Window Flashing Repair Options and Prevention
- Severity Levels and When to Act
- Frequently Asked Questions
Last Updated: October 14, 2026
Why Window Flashing Installation Matters
Window flashing installation is one of the most critical, and most overlooked, parts of protecting your home from water damage.
Flashing sits hidden once the siding goes up, so poor installation often goes unnoticed until water damage appears inside, by then, the problem has been spreading for months or years.
Gaps, missing overlaps, reversed flashing, and improper sealant application create pathways for water to penetrate your home’s exterior.
This guide covers how to identify signs of poor window flashing installation, what to look for during a home inspection, and when to call a professional.
Visible Signs of a Bad Window Installation
The visible symptoms of poor window flashing installation are your first clue that something’s wrong. They appear on the exterior and interior of your home, often in predictable patterns.
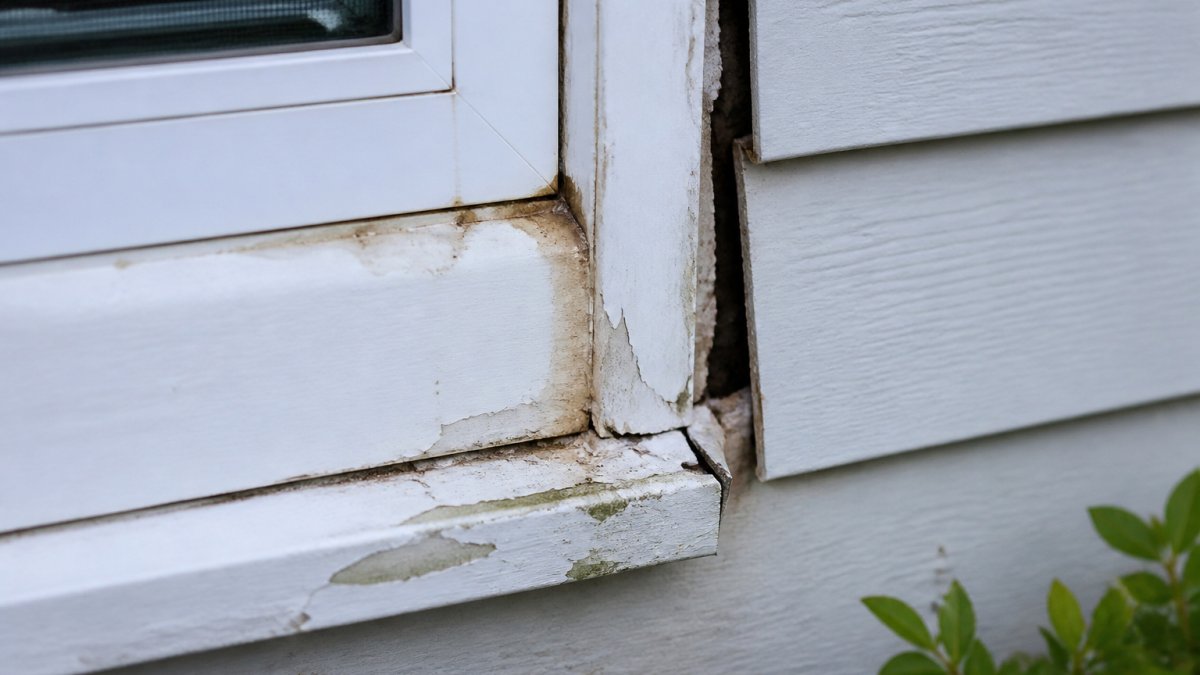
Water Leaks and Stains Around Window Frames
Water stains below or beside windows are the clearest indicator of a flashing problem.
Discoloration only around the window perimeter suggests water is entering at the frame itself, not from a roof leak or gutter problem.
Interior water stains are even more serious. Wet drywall, water rings, or soft spots on the wall inside your home near a window mean the flashing has failed completely and water is traveling into the wall cavity.
Paint Bubbles, Peeling, and Discoloration
Paint bubbles and peeling around window frames signal moisture trapped behind the paint. Water seeps into the substrate, pushing the paint away until it cracks and peels.
If the rest of your siding’s paint holds up fine but the paint around windows fails, the problem is water entry at the window, not a general paint issue.
Drafts, Condensation, and Foggy Panes
Drafts around windows suggest gaps in the installation that allow air to flow. While drafts can also come from weatherstripping failure, they often accompany flashing problems: the same gaps that let water in also let air through.
Foggy windows with moisture between panes mean the window unit itself has failed, separate from flashing failure, though flashing failure often accelerates seal failure by damaging the frame and sash.
Soft, Swollen, or Rotting Sills and Frames
Wood rot is the end stage of water intrusion. If the sill feels soft when you press on it, or the wood appears swollen or discolored, water has been penetrating the frame for an extended period.
Rot typically starts at the bottom of the frame where water pools.
Check the sill pan, the metal or composite tray at the bottom of the opening.
Missing Window and Door Flashing: What It Looks Like
Some installations lack flashing entirely. This is rare in modern construction but still happens with rushed jobs or DIY installations. Missing flashing is easier to spot than improper flashing because the gaps are visible.
Gaps Between Frame and Rough Opening
Look at the perimeter where the window frame meets the house structure.
Gaps allow direct water entry and air leakage, a small gap is enough for capillary action to pull water into the wall cavity.
Examine the top of the window frame first. Head flashing should extend above the window and behind the exterior cladding. If the frame material is exposed at the top, flashing is missing or improperly lapped.
Exposed House Wrap or Weather-Resistive Barrier
House wrap is a secondary water barrier, not a substitute for flashing.
House wrap should sit behind the flashing, not be visible from outside. Exposed wrap indicates missing flashing or flashing that doesn’t extend far enough to overlap it properly.
Where the house wrap meets the window frame, there should be a continuous seal. If the wrap is loose, torn, or peeling away, water can work its way under it.
How to Inspect Window Flashing Without Removing Siding
You don’t need to tear off your siding to assess window flashing condition. A careful visual inspection from the exterior reveals most problems.
Step 1: Look for Visible Gaps and Separation
Start at the top of each window and look for gaps between the frame and the surrounding wall structure. Where the head flashing meets the frame, there should be no visible separation.
Move to the sides: side flashing should overlap the frame and extend behind the cladding. If the frame edge is exposed, flashing is missing or too short.
Use a flashlight to look into these areas. Shadows reveal gaps that might not be obvious in bright light.
Step 2: Check for Water Damage Patterns
Look for water stains, discoloration, or paint failure around the window.
Water stains on the exterior cladding below windows often indicate the sill pan is blocked or missing. Water should exit through the bottom of the frame, not run down the exterior wall.
Check for mold or mildew around the window frame. Dark spots or fuzzy growth indicate persistent moisture, suggesting water is entering regularly, not from a one-time event.
Step 3: Inspect Caulking and Sealant Condition
Caulking around the window frame should be continuous and intact. Look for cracks, gaps, or areas where caulk has pulled away from the frame or cladding.
Caulk fails over time from UV exposure and temperature cycles, and cracked or missing caulk lets water enter.
Press on the caulk with your finger. It should be flexible and springy. If it crumbles or feels hard and brittle, it’s failed and should be replaced.
Step 4: Test for Air Leakage
On a windy day, hold your hand near the window frame edges and feel for air movement. Air leakage suggests gaps that also allow water entry.
On a calm day, light a candle or incense near the window frame. If the smoke moves toward or away from the frame, air is leaking.
Air leakage doesn’t prove flashing failure, but it’s a strong indicator. Proper flashing installation includes sealing gaps with insulation and sealant, which also stops air leakage.
Distinguishing Flashing Failure from Other Causes
Not every water stain or draft around a window means flashing has failed. Other problems can mimic flashing failure symptoms.
Flashing Failure vs. Interior Condensation
Interior condensation appears on the inside surface of windows during cold weather, moisture from indoor air condensing on cold glass (the EPA). It’s normal in homes with high humidity, especially bathrooms and kitchens.
Flashing failure creates water stains on exterior or interior walls, not just the glass, stains appear on drywall, paint, or wood.
If you see water running down the interior wall or pooling on the window sill, that’s water intrusion from flashing failure.
Flashing Failure vs. Gutter or Downspout Problems
Gutters and downspouts that don’t work properly can cascade water down the exterior wall, creating stains that look like window leaks. The difference is the pattern and location.
Gutter problems create stains that run vertically down the wall, often in multiple locations.
Check your gutters: if they’re clogged, overflowing, or downspouts discharge near the foundation, that could be your problem. Clean them, redirect downspouts away from the house, then monitor the windows for new staining.
Window Flashing Repair Options and Prevention
Repair options depend on the severity of the damage and the cause of the failure.
When Repairs Are Possible
Minor caulk failure can be repaired by removing old caulk and applying new sealant, a homeowner-friendly fix that costs little and takes an hour or two.
Weep holes that are clogged can be cleared, restoring drainage. If the sill pan is intact but blocked by debris or caulk, clearing it solves the problem.
When Replacement Is Necessary
If the window frame has rotted wood, the window must be removed and replaced.
If the sill pan is corroded or has holes, it must be replaced. This requires removing the window and installing new flashing.
If flashing is missing, reversed, or improperly installed throughout, the window should be removed and reinstalled with proper flashing.
Prevention Through Proper Installation
Proper window flashing installation includes these elements:
- Head flashing that extends above the window and laps over the weather-resistive barrier
- Side flashing that overlaps the frame and extends behind cladding
- Sill pan that sits under the frame with proper slope and drainage
- Continuous sealant behind flashing (back caulking)
- Weep holes at the bottom for drainage
- Insulation that fills gaps without blocking drainage
Proper window flashing installation includes correct lapping, drainage, and sealant application. Our installations come with warranties that protect against water intrusion.
Severity Levels and When to Act
Not all flashing problems require immediate action, but knowing the severity helps you prioritize repairs.
Minor Issues: Cosmetic Damage
Caulk cracks, small paint bubbles, or minor discoloration are cosmetic problems that don’t indicate active water intrusion. These should be addressed within a year to prevent water from entering.
Re-seal failed caulk and scrape, dry, and repaint paint bubbles to keep minor problems from becoming major ones.
Moderate Issues: Active Water Intrusion
Water stains that are actively growing, interior wall dampness, or visible mold indicate water is currently entering your home and should be addressed within weeks.
Active water intrusion causes ongoing damage to framing and insulation, and the longer you wait, the more accumulates. A professional inspection determines the exact cause and scope of repair.
Severe Issues: Structural Damage and Mold
Structural damage compromises the window and your home’s integrity, and mold poses health risks and spreads if not addressed.
Water damage around windows is expensive to repair and easy to prevent with proper flashing installation.
We use quality materials, proven installation methods, and comprehensive warranties to ensure your windows stay dry and your home stays protected.
Frequently Asked Questions
What are the most common signs of poor window flashing installation?
The most visible signs include water leaks and stains around the window frame, peeling or bubbling paint on the exterior, drafts and air leakage, and soft or rotting wood on the sill. Condensation between panes, damp odors inside, and mold growth indicate moisture has breached the flashing. Check the exterior for gaps between the frame and rough opening, exposed house wrap, or missing sealant along the edges. These symptoms suggest the flashing, head flashing, or sill pan failed to create a proper drainage plane.
How can you tell if a window is leaking because of faulty flashing rather than condensation?
Condensation forms on the interior glass surface when warm indoor air meets cold glass, and it appears as light moisture that wipes away. Water from flashing failure appears as stains, discoloration, or wet spots on the wall, sill, or frame itself, not just on the glass. Flashing leaks cause visible water damage patterns, peeling paint, and damp odors, often concentrated at the bottom or sides of the frame. If you see water pooling on the interior sill or staining the wall below the window after rain, flashing failure is the likely cause, not interior humidity.
Can poor window flashing be repaired without replacing the entire window?
Yes, if the damage is caught early. Resealing gaps with caulk or flashing tape, replacing damaged sealant, or adding missing back caulking can stop minor leaks. However, if the flashing itself is bent, corroded, or improperly lapped, or if water damage has reached the frame, sill pan, or house wrap, repair becomes difficult without removal. Severe wood rot, mold growth, or structural damage usually requires window replacement and proper reinstallation with correct flashing, head flashing, and drainage path setup. A professional inspection determines whether repair or replacement is the better choice.
What should proper window flashing installation look like?
Proper installation includes a weather-resistive barrier (house wrap) underneath the flashing, a sill pan at the bottom to direct water downward, head flashing above to shed rain away, and side flashing with shingle-style lapping that overlaps the exterior cladding. Flashing tape seals gaps at the rough opening edges, and back caulking fills the joint between the flashing and frame. The drainage plane should slope away from the frame so water exits at the bottom, not pooling or backing up. All joints and seams must be sealed without gaps, and the installation must account for the specific wall assembly and climate exposure in your region.